|
|
| (11 intermediate revisions by 6 users not shown) |
| Line 19: |
Line 19: |
| ==Items== | | ==Items== |
| {{Itlisth|land}} | | {{Itlisth|land}} |
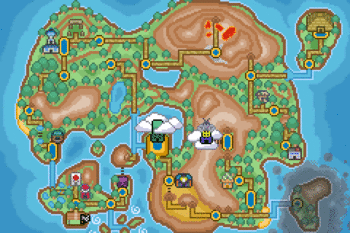
| | {{Itemlist|Max Potion|Near the beginning of the route, close to the trees along the bottom of the first grass patches|display= {{BLink|Max Potion}}}} |
| {{Itemlist|X Attack|Below the right side of the train tracks (requires [[Tesseract]])|display={{BLink|X Attack}}}} | | {{Itemlist|X Attack|Below the right side of the train tracks (requires [[Tesseract]])|display={{BLink|X Attack}}}} |
| {{Itemlist|electrictm|Northwest of the house, hidden behind the trees|display=TM25 {{BLink|Thunder}}}} | | {{Itemlist|electrictm|Northwest of the house, hidden behind the trees|display=TM25 {{BLink|Thunder}}}} |
| {{Itemlist|Max Elixir|Behind the right tower next to the house|display={{BLink|Max Elixir}}}} | | {{Itemlist|Max Elixir|Behind the right tower next to the house|display={{BLink|Max Elixir}}}} |
| {{Itemlist|watertm|On the platform in the center of the route (requires [[Heart Swap]])|display=TM18 {{BLink|Rain Dance}}}} | | {{Itemlist|watertm|On the platform in the center of the route (requires [[Heart Swap]])|display=TM18 {{BLink|Rain Dance}}}} |
| {{Itemlist|Great Ball|(requires [[Heart Swap]] and [[Scuba Gear]])|display={{BLink|Great Ball}}}} | | {{Itemlist|Great Ball|Underwater, along the bottom edge below some seaweed (requires [[Heart Swap]] and [[Dive]])|display={{BLink|Great Ball}}}} |
| {{Itemlist|Hyper Potion|(requires [[Heart Swap]] and [[Tesseract]])|display={{BLink|Hyper Potion}}}} | | {{Itemlist|Hyper Potion|Left side of the Route, on the shore (requires [[Heart Swap]], [[Dive]], and [[Tesseract]])|display={{BLink|Hyper Potion}}}} |
| {{Itemlist|Garchompite|(requires [[Heart Swap]] and [[Tesseract]])|display={{BLink|Garchompite}}}} | | {{Itemlist|Garchompite|Left side of the Route, on the shore (requires [[Heart Swap]], [[Dive]], and [[Tesseract]])|display={{BLink|Garchompite}}}} |
| {{Itlistfoot|land}} | | {{Itlistfoot|land}} |
|
| |
|
| Line 38: |
Line 39: |
| ==Pokémon== | | ==Pokémon== |
| A {{p|Hypno}} will randomly replace encounters on this route after talking to a woman in [[Amphitrite City]] until it is captured. | | A {{p|Hypno}} will randomly replace encounters on this route after talking to a woman in [[Amphitrite City]] until it is captured. |
| | |
| | Interacting with the TV in the route's house has a chance of spawning a {{p|Rotom}}. |
|
| |
|
| {{Catch/header|land|2}} | | {{Catch/header|land|2}} |
| Line 54: |
Line 57: |
| {{Catch/div|water|Fishing}} | | {{Catch/div|water|Fishing}} |
| {{Catch/entry6|319|Sharpedo|yes|yes|Fish Old|type1=Water|type2=Dark|59-63|all = 70%}} | | {{Catch/entry6|319|Sharpedo|yes|yes|Fish Old|type1=Water|type2=Dark|59-63|all = 70%}} |
| {{Catch/entry6|593|Jellicent|yes|yes|Fish Old|type1=Water|type2=Ghost|23-26|all = 30%}} | | {{Catch/entry6|593|Jellicent|yes|yes|Fish Old|type1=Water|type2=Ghost|59-63|all = 30%}} |
| {{Catch/entry6|171|Lanturn|yes|yes|Fish Good|type1=Water|type2=Electric|59-63|all = 60%}} | | {{Catch/entry6|171|Lanturn|yes|yes|Fish Good|type1=Water|type2=Electric|59-63|all = 60%}} |
| {{Catch/entry6|370|Luvdisc|yes|yes|Fish Good|type1=Water|55-59|all = 20%}} | | {{Catch/entry6|370|Luvdisc|yes|yes|Fish Good|type1=Water|55-59|all = 20%}} |
| Line 68: |
Line 71: |
| {{Catch/entry6|215|Sneasel|yes|yes|Grotto|type1=Dark|type2=Ice|10|all=25%}} | | {{Catch/entry6|215|Sneasel|yes|yes|Grotto|type1=Dark|type2=Ice|10|all=25%}} |
| {{Catch/entry6|559|Scraggy|yes|yes|Grotto|type1=Dark|type2=Fighting|10|all=25%}} | | {{Catch/entry6|559|Scraggy|yes|yes|Grotto|type1=Dark|type2=Fighting|10|all=25%}} |
| {{catch/div|Building|Special}} | | {{catch/div|land|Special}} |
| {{Catch/entry6|097|Hypno|yes|yes|Special|25|all=One|type1=Psychic}} | | {{Catch/entry6|097|Hypno|yes|yes|Special|25|all=One|type1=Psychic}} |
| | {{catch/entry6|479|Rotom|yes|yes|Interact|Highest level Pokémon, minimum of 10|all=Infinite|type1=Electric|type2=Ghost}} |
| {{Catch/footer|Land}} | | {{Catch/footer|Land}} |
|
| |
|
| ==Trainers== | | ==Trainers== |
| {{trainerheader|land}} | | {{trainerheader|land}} |
| {{Trainerentry|Socialite.png{{!}}150px|Socialite|Jennifer|2680|3|134|Vaporeon||66|None|135|Jolteon||67|None|136|Flareon||66|None}} | | {{Trainerentry|Socialite.png{{!}}150px|Socialite|Jennifer|2680|3|136|Flareon||66|None|134|Vaporeon||66|None|135|Jolteon||67|None}} |
| {{Trainerentry|Rich Boy.png{{!}}150px|Rich Boy|Oates|4824|2|162|Furret||67|None|184|Azumarill||67|None}} | | {{Trainerentry|Rich Boy.png{{!}}150px|Rich Boy|Oates|4824|2|162|Furret||67|None|184|Azumarill||67|None}} |
| {{Trainerentry|Dragon Tamer.png{{!}}150px|Dragon Tamer|Cade|4080|1|149|Dragonite||68|None}} | | {{Trainerentry|Dragon Tamer.png{{!}}150px|Dragon Tamer|Cade|4080|1|149|Dragonite||68|None}} |
| {{Trainerentry|Ace Trainer.png{{!}}150px|Ace Trainer|Calla|4020|3|617|Accelgor||66|None|350|Milotic||66|None|681|Aegislash||67|None}} | | {{Trainerentry|Ace Trainerf.png{{!}}150px|Ace Trainer|Calla|4020|3|617|Accelgor||66|None|350|Milotic||66|None|681|Aegislash||67|None}} |
| {{Trainerentry|Scientist.png{{!}}150px|Scientist|Maria|3216|2|601|Klinklang||67|None|462|Magnezone||67|None}} | | {{Trainerentry|Scientistf.png{{!}}150px|Scientist|Maria|3216|2|601|Klinklang||67|None|462|Magnezone||67|None}} |
| {{trainerfooter|land|6}} | | {{trainerfooter|land|6}} |
|
| |
|