Cyan Cavern: Difference between revisions
From The Pokemon Insurgence Wiki
mNo edit summary |
Changed infobox to route one, fixed generation |
||
| (14 intermediate revisions by 8 users not shown) | |||
| Line 1: | Line 1: | ||
{{ | {{Route infobox | ||
|type=cave | |type=cave | ||
|image=CyanCavern1.png | |image=CyanCavern1.png | ||
| | |name=Cyan Cavern | ||
| | |north=Route 2 | ||
|south=Suntouched City | |||
|region=Torren | |region=Torren | ||
|generation= | |generation=6 | ||
| | |size=350px | ||
|mapsize=350px | |mapsize=350px | ||
|map=Torren_Cyan_Cavern_Map. | |map=Torren_Cyan_Cavern_Map.gif}} | ||
'''Cyan Cavern''' is a two-floored cave that connects [[Route 2]] and [[Suntouched City]]. | '''Cyan Cavern''' is a two-floored cave that connects [[Route 2]] and [[Suntouched City]]. | ||
| Line 15: | Line 16: | ||
==Items== | ==Items== | ||
{{Itlisth|cave}} | {{Itlisth|cave}} | ||
{{Itemlist|Magnet|B1F; at the top of the rock formation in the middle of the area|display={{BLink|Magnet}}}} | {{Itemlist|Magnet|B1F; at the top of the rock formation in the middle of the area|display={{BLink|Magnet}}}} | ||
{{Itemlist|Great Ball|B1F; on the ground along the northern-most wall|display={{BLink|Great Ball}}}} | {{Itemlist|Great Ball|B1F; on the ground along the northern-most wall|display={{BLink|Great Ball}}}} | ||
{{Itemlist|Feraligatite|B1F; at the bottom of the lake (requires {{m|Dive}})|display=[[Mega Stones#Feraligatite|Feraligatite]]}} | |||
{{Itemlist|steeltm|1F; northwestern corner of the map (requires {{m|Rock Climb}})|display=[[bulbapedia:Iron Tail (move)|TM23 Iron Tail]]}} | |||
{{Itlistfoot|cave}} | {{Itlistfoot|cave}} | ||
| Line 41: | Line 45: | ||
==Pokémon== | ==Pokémon== | ||
===1F=== | |||
{{Catch/header|cave|2}} | |||
{{Catch/entry6|081|Magnemite|yes|yes|Cave|15-17|type1=Electric|type2=Steel|all=20%}} | |||
{{Catch/entry6|095|Onix|yes|yes|Cave|15-17|type1=Rock|type2=Ground|all=10%}} | |||
{{Catch/entry6|213|Shuckle|yes|yes|Cave|15-17|type1=Bug|type2=Rock|all=5%}} | |||
{{Catch/entry6|293|Whismur|yes|yes|Cave|15-17|type1=Normal|all=30%}} | |||
{{Catch/entry6|296|Makuhita|yes|yes|Cave|15-17|type1=Fighting|all=4%}} | |||
{{Catch/entry6|302|Sableye|yes|yes|Cave|15-17|type1=Dark|type2=Ghost|all=20%}} | |||
{{Catch/entry6|524|Roggenrola|yes|yes|Cave|15-17|type1=Rock|all=10%}} | |||
{{Catch/entry6|674|Pancham|yes|yes|Cave|15-17|type1=Fighting|all=1%}} | |||
{{Catch/div|cave|Rock Smash}} | |||
{{Catch/entry6|074|Geodude|yes|yes|Rock Smash|Scales with Party Pokémon|type1=Rock|type2=Ground|all=33%}} | |||
{{Catch/entry6|213|Shuckle|yes|yes|Rock Smash|Scales with Party Pokémon|type1=Bug|type2=Rock|all=8.5%}} | |||
{{Catch/entry6|299|Nosepass|yes|yes|Rock Smash|Scales with Party Pokémon|type1=Rock|all=16.5%}} | |||
{{Catch/entry6|524|Roggenrola|yes|yes|Rock Smash|Scales with Party Pokémon|type1=Rock|all=25%}} | |||
{{Catch/entry6|557|Dwebble|yes|yes|Rock Smash|Scales with Party Pokémon|type1=Bug|type2=Rock|all=8.5%}} | |||
{{Catch/entry6|703|Carbink|yes|yes|Rock Smash|Scales with Party Pokémon|type1=Rock|type2=Fairy|all=8.5%}} | |||
{{Catch/footer|cave}} | |||
===B1F=== | |||
{{Catch/header|cave|2}} | {{Catch/header|cave|2}} | ||
{{Catch/entry6|081|Magnemite|yes|yes|Cave|15-17|type1=Electric|type2=Steel|all=20%}} | {{Catch/entry6|081|Magnemite|yes|yes|Cave|15-17|type1=Electric|type2=Steel|all=20%}} | ||
| Line 46: | Line 70: | ||
{{Catch/entry6|213|Shuckle|yes|yes|Cave|15-17|type1=Bug|type2=Rock|all=5%}} | {{Catch/entry6|213|Shuckle|yes|yes|Cave|15-17|type1=Bug|type2=Rock|all=5%}} | ||
{{Catch/entry6|293|Whismur|yes|yes|Cave|15-17|type1=Normal|all=30%}} | {{Catch/entry6|293|Whismur|yes|yes|Cave|15-17|type1=Normal|all=30%}} | ||
{{Catch/entry6|296|Makuhita|yes|yes|Cave|15-17|type1=Fighting|all= | {{Catch/entry6|296|Makuhita|yes|yes|Cave|15-17|type1=Fighting|all=4%}} | ||
{{Catch/entry6|302|Sableye|yes|yes|Cave|15-17|type1=Dark|type2=Ghost|all=20%}} | {{Catch/entry6|302|Sableye|yes|yes|Cave|15-17|type1=Dark|type2=Ghost|all=20%}} | ||
{{Catch/entry6|524|Roggenrola|yes|yes|Cave|15-17|type1=Rock|all=10%}} | {{Catch/entry6|524|Roggenrola|yes|yes|Cave|15-17|type1=Rock|all=10%}} | ||
{{Catch/entry6|674|Pancham|yes|yes|Cave|15-18|type1=Fighting|all=1%}} | |||
{{Catch/div|water|Surfing}} | {{Catch/div|water|Surfing}} | ||
{{Catch/entry6|194|Wooper|yes|yes|Surf|15-17|type1=Water|type2=Ground|all=90%}} | {{Catch/entry6|194|Wooper|yes|yes|Surf|15-17|type1=Water|type2=Ground|all=90%}} | ||
| Line 57: | Line 82: | ||
{{Catch/entry6|129|Magikarp|yes|yes|Fish Good|15-17|type1=Water|all=60%}} | {{Catch/entry6|129|Magikarp|yes|yes|Fish Good|15-17|type1=Water|all=60%}} | ||
{{Catch/entry6|369|Relicanth|yes|yes|Fish Good|15-17|type1=Water|type2=Rock|all=40%}} | {{Catch/entry6|369|Relicanth|yes|yes|Fish Good|15-17|type1=Water|type2=Rock|all=40%}} | ||
{{Catch/entry6|130|Gyarados|yes|yes|Fish Super|15-17|type1=Water|type2=Flying|all=40%}} | |||
{{Catch/entry6|369|Relicanth|yes|yes|Fish Super|15-17|type1=Water|type2=Rock|all=60%}} | |||
{{Catch/div|cave|Rock Smash}} | {{Catch/div|cave|Rock Smash}} | ||
{{Catch/entry6|074|Geodude|yes|yes|Rock Smash|Scales with Party Pokémon|type1=Rock|type2=Ground|all=33%}} | {{Catch/entry6|074|Geodude|yes|yes|Rock Smash|Scales with Party Pokémon|type1=Rock|type2=Ground|all=33%}} | ||
| Line 70: | Line 97: | ||
{{trainerheader|cave}} | {{trainerheader|cave}} | ||
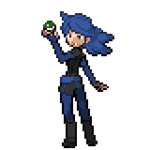
{{Trainerentry|Ace Trainerf.png{{!}}150px|Ace Trainer|Nina|1020|3|025|Pikachu||17|None|352|Kecleon||17|None|704|Goomy||17|None}} | {{Trainerentry|Ace Trainerf.png{{!}}150px|Ace Trainer|Nina|1020|3|025|Pikachu||17|None|352|Kecleon||17|None|704|Goomy||17|None}} | ||
{{trainerdiv|cave}} | {{trainerdiv|cave}} | ||
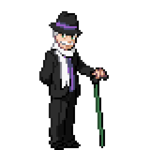
{{Trainerentry|Gentleman.png{{!}}150px|Gentleman|Jimmy|1296|3|570|Zorua||17|None|104|Cubone||17|None|088|Grimer||18|None}} | {{Trainerentry|Gentleman.png{{!}}150px|Gentleman|Jimmy|1296|3|570|Zorua||17|None|104|Cubone||17|None|088|Grimer||18|None}} | ||
Latest revision as of 10:25, 17 December 2021
| |||||||||||||
| |||||||||||||
Connecting locations
| |||||||||||||
Location 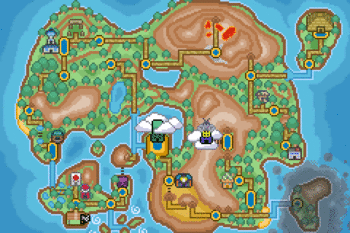 Interactive Map Location of Cyan Cavern in Torren. | |||||||||||||

Cyan Cavern is a two-floored cave that connects Route 2 and Suntouched City.
Walkthrough
- The pathway through this area is very straightforward; simply follow the path between the two floors in order to reach the exit to Suntouched City.
Items
| Item | Location | ||
|---|---|---|---|
| Magnet | B1F; at the top of the rock formation in the middle of the area | ||
| Great Ball | B1F; on the ground along the northern-most wall | ||
| Feraligatite | B1F; at the bottom of the lake (requires Dive) | ||
| TM23 Iron Tail | 1F; northwestern corner of the map (requires Rock Climb) | ||
Rock Smash
| Item | Location | ||
|---|---|---|---|
| Hard Stone | Randomly found by smashing rocks | ||
| IV Stone | Randomly found by smashing rocks | ||
| Heart Scale | Randomly found by smashing rocks | ||
| Pearl | Randomly found by smashing rocks | ||
| Soft Sand | Randomly found by smashing rocks | ||
| Helix Fossil | Randomly found by smashing rocks | ||
| Dome Fossil | Randomly found by smashing rocks | ||
| Old Amber | Randomly found by smashing rocks | ||
| Root Fossil | Randomly found by smashing rocks | ||
| Claw Fossil | Randomly found by smashing rocks | ||
| Skull Fossil | Randomly found by smashing rocks | ||
| Armor Fossil | Randomly found by smashing rocks | ||
| Cover Fossil | Randomly found by smashing rocks | ||
| Plume Fossil | Randomly found by smashing rocks | ||
| Jaw Fossil | Randomly found by smashing rocks | ||
| Sail Fossil | Randomly found by smashing rocks | ||
Pokémon
1F
| Pokémon | Location | Levels | Rate | |||||||
|---|---|---|---|---|---|---|---|---|---|---|
|
|
15-17 | 20%
| |||||||
|
|
15-17 | 10%
| |||||||
|
|
15-17 | 5%
| |||||||
|
|
15-17 | 30%
| |||||||
|
|
15-17 | 4%
| |||||||
|
|
15-17 | 20%
| |||||||
|
|
15-17 | 10%
| |||||||
|
|
15-17 | 1%
| |||||||
| Rock Smash | ||||||||||
|
|
Scales with Party Pokémon | 33%
| |||||||
|
|
Scales with Party Pokémon | 8.5%
| |||||||
|
|
Scales with Party Pokémon | 16.5%
| |||||||
|
|
Scales with Party Pokémon | 25%
| |||||||
|
|
Scales with Party Pokémon | 8.5%
| |||||||
|
|
Scales with Party Pokémon | 8.5%
| |||||||


B1F
| Pokémon | Location | Levels | Rate | |||||||
|---|---|---|---|---|---|---|---|---|---|---|
|
|
15-17 | 20%
| |||||||
|
|
15-17 | 10%
| |||||||
|
|
15-17 | 5%
| |||||||
|
|
15-17 | 30%
| |||||||
|
|
15-17 | 4%
| |||||||
|
|
15-17 | 20%
| |||||||
|
|
15-17 | 10%
| |||||||
|
|
15-18 | 1%
| |||||||
| Surfing | ||||||||||
|
|
15-17 | 90%
| |||||||
|
|
14-16 | 10%
| |||||||
| Fishing | ||||||||||
|
|
15-17 | 70%
| |||||||
|
|
15-17 | 30%
| |||||||
|
|
15-17 | 60%
| |||||||
|
|
15-17 | 40%
| |||||||
|
|
15-17 | 40%
| |||||||
|
|
15-17 | 60%
| |||||||
| Rock Smash | ||||||||||
|
|
Scales with Party Pokémon | 33%
| |||||||
|
|
Scales with Party Pokémon | 8.5%
| |||||||
|
|
Scales with Party Pokémon | 16.5%
| |||||||
|
|
Scales with Party Pokémon | 25%
| |||||||
|
|
Scales with Party Pokémon | 8.5%
| |||||||
|
|
Scales with Party Pokémon | 8.5%
| |||||||


Trainers
1F
| Trainer | Pokémon | |||||||||||
|---|---|---|---|---|---|---|---|---|---|---|---|---|
|
| |||||||||||
| ||||||||||||
| ||||||||||||
|
| |||||||||||
| ||||||||||||
| ||||||||||||
|
| |||||||||||
| ||||||||||||


B1F
| Trainer | Pokémon | |||||||||||
|---|---|---|---|---|---|---|---|---|---|---|---|---|
|
| |||||||||||
| ||||||||||||
| ||||||||||||
|
| |||||||||||
| ||||||||||||


Layout
| 1F | B1F |
|---|---|

|

|
Trivia
- A Secret Base theme exists whose name and design are derived from this location.