Fiery Caverns: Difference between revisions
From The Pokemon Insurgence Wiki
mNo edit summary |
m →Items |
||
| (15 intermediate revisions by 4 users not shown) | |||
| Line 11: | Line 11: | ||
|image_size=350px | |image_size=350px | ||
}} | }} | ||
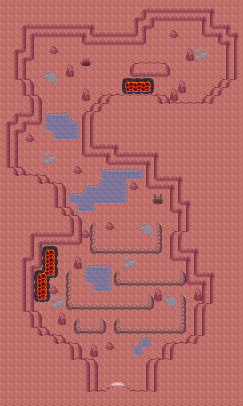
The '''Fiery Caverns''' are a series of caves found within [[Hekate Town]]. The caves are filled with numerous pools of lava, some of which require the player to push boulders into in order to cross. When the player investigates the caves for the first time, they will face [[Infernal Cult]]ists and attempt to stop their operation. | |||
==Walkthrough== | ==Walkthrough== | ||
* Bypass the ledges and [[surf]] north across the two pools of water. | |||
* Travel east until a boulder is located. | |||
** Push the boulder north and then west into the hole in the floor. | |||
* Follow the boulder down into the hole. | |||
* Hop across the boulder to the other side of the lava and then head up the stairs to find the next boulder. | |||
* | ** Push this boulder down and then head down the stairs to the left side of where the boulder landed. | ||
* | ** Push the boulder all the way to the right until it stops against a pool of lava, then run around to the top side of the boulder and push it three spaces down. | ||
** Run around to the right side of the boulder and push it as far left as possible, then run around to the top side of it and push it as far down as possible. | |||
* | ** Run around to the right side of the boulder and push it 7 spaces to the left, then run around to the top side of it and push it as far down as possible. | ||
* | ** Push the boulder to the right until it is knocked out into the pool of lava and blocks off the lava's flow. | ||
* | * Head northwest and hop back across the lava again before heading south and passing over the platform to the east. | ||
* Continue east until the player reaches the entrance to the next cave. | |||
*Push right | * Once inside the next cave, follow the path northward until the player comes to a bridge. | ||
* Cross the bridge, head east and climb up the platform, and then push the next boulder down to the level below. | |||
* | ** Head down to the level below and push the boulder from the right side as far left as possible. | ||
* | ** Push the boulder down three spaces and then push the boulder to the left until it is in front of the bridge. | ||
*Push the boulder | ** Push the boulder up until it collides with the ledge and then push the boulder as far right as possible. | ||
** Push the boulder up 2 spaces and then push it right 5 spaces. | |||
*Push the boulder up until | ** Push the boulder up as far as possible and then push it left 3 spaces. | ||
** Push the boulder up as far as possible and then push it to the left and into the pool of lava to raise the bridge's level up. | |||
*Push the boulder | * Navigate around the ledges to cross the newly raised bridge. | ||
*Push the boulder | * Continue north to proceed with the story. | ||
* | |||
*Push the boulder up | |||
* | |||
==Items== | ==Items== | ||
{{Itlisth|cave}} | {{Itlisth|cave}} | ||
{{Itemlist|Mysterious Scroll| | {{Itemlist|Mysterious Scroll|Head up the ladder on B1F; reward for completing the {{p|Meloetta}} tile puzzle}} | ||
{{Itemlist|Delta Froslassite|B1F Room 3; to the right of the [[Delta Snorunt]] (requires [[Tesseract]])|display={{DL|Mega Stone|Delta Froslassite}}}} | |||
{{Itemlist|Delta Glalitite|B1F Room 3; to the left of the [[Delta Snorunt]] (requires [[Tesseract]])|display={{DL|Mega Stone|Delta Glalitite}}}} | |||
{{Itlistfoot|cave}} | {{Itlistfoot|cave}} | ||
==Pokémon== | ==Pokémon== | ||
[[Delta Snorunt]] can be encountered by using [[Tesseract]] in the area with the third boulder and then following the path northwestward. | |||
{{p|Heatran}} has the possibility of spawning in B1F, Room 3 if and only if the player knocks it out during the events concerning the {{BLink|Magma Stone}} in the [[Infernal Dungeon]]. | |||
===1F=== | |||
{{Catch/header|cave|2}} | {{Catch/header|cave|2}} | ||
{{Catch/entry6|324|Torkoal|yes|yes|Cave|type1=Fire| | {{Catch/entry6|126|Magmar|yes|yes|Cave|type1=Fire|49-53|all = 14%}} | ||
{{Catch/entry6|219|Magcargo|yes|yes|Cave|type1=Fire|type2=Rock|53-57|all = 25%}} | |||
{{Catch/entry6|323|Camerupt|yes|yes|Cave|type1=Fire|type2=Ground|53-57|all = 11%}} | |||
{{Catch/entry6|324|Torkoal|yes|yes|Cave|type1=Fire|53-57|all = 25%}} | |||
{{Catch/entry6|514|Simisear|yes|yes|Cave|type1=Fire|53-57|all = 11%}} | |||
{{Catch/entry6|555|Darmanitan|yes|yes|Cave|type1=Fire|53-57|all = 14%}} | |||
{{Catch/div|water|Surfing}} | |||
{{Catch/entry6|073|Tentacruel|yes|yes|Surf|type1=Water|type2=Poison|53-57|all = 30%}} | |||
{{Catch/entry6|278|Wingull|yes|yes|Surf|type1=Water|type2=Flying|49-53|all = 60%}} | |||
{{Catch/entry6|319|Sharpedo|yes|yes|Surf|type1=Water|type2=Dark|53-57|all = 1%}} | |||
{{Catch/entry6|320|Wailmer|yes|yes|Surf|type1=Water|49-53|all = 5%}} | |||
{{Catch/entry6|581|Swanna|yes|yes|Surf|type1=Water|type2=Flying|53-57|all = 4%}} | |||
{{Catch/div|water|Fishing}} | |||
{{Catch/entry6|129|Magikarp|yes|yes|Fish Old|type1=Water|49-53|all = 70%}} | |||
{{Catch/entry6|211|Qwilfish|yes|yes|Fish Old|type1=Water|type2=Poison|49-53|all = 30%}} | |||
{{Catch/entry6|130|Gyarados|yes|yes|Fish Good|type1=Water|type2=Flying|53-57|all = 40%}} | |||
{{Catch/entry6|211|Qwilfish|yes|yes|Fish Good|type1=Water|type2=Poison|53-57|all = 60%}} | |||
{{Catch/entry6|171|Lanturn|yes|yes|Fish Super|type1=Water|type2=Electric|53-57|all = 4%}} | |||
{{Catch/entry6|211|Qwilfish|yes|yes|Fish Super|type1=Water|type2=Poison|53-57|all = 40%}} | |||
{{Catch/entry6|349|Feebas|yes|yes|Fish Super|type1=Water|5-10|all = 1%}} | |||
{{Catch/entry6|367|Huntail|yes|yes|Fish Super|type1=Water|53-57|all = 15%}} | |||
{{Catch/entry6|368|Gorebyss|yes|yes|Fish Super|type1=Water|53-57|all = 40%}} | |||
{{Catch/div|cave|Special}} | {{Catch/div|cave|Special}} | ||
{{Catch/entry6|758|Delta Snorunt|yes|yes|Special|50|type1=Fire|type2=Rock|all=One}} | {{Catch/entry6|758|Delta Snorunt|yes|yes|Special|50|type1=Fire|type2=Rock|all=One}} | ||
{{Catch/footer|cave}} | |||
===B1F=== | |||
{{Catch/header|cave|2}} | |||
{{Catch/entry6|126|Magmar|yes|yes|Cave|type1=Fire|49-53|all = 14%}} | |||
{{Catch/entry6|219|Magcargo|yes|yes|Cave|type1=Fire|type2=Rock|53-57|all = 25%}} | |||
{{Catch/entry6|323|Camerupt|yes|yes|Cave|type1=Fire|type2=Ground|53-57|all = 11%}} | |||
{{Catch/entry6|324|Torkoal|yes|yes|Cave|type1=Fire|53-57|all = 25%}} | |||
{{Catch/entry6|514|Simisear|yes|yes|Cave|type1=Fire|53-57|all = 11%}} | |||
{{Catch/entry6|555|Darmanitan|yes|yes|Cave|type1=Fire|53-57|all = 14%}} | |||
{{Catch/footer|cave}} | |||
===B1F (Inner Cave)=== | |||
{{Catch/header|cave|2}} | |||
{{Catch/entry6|051|Dugtrio|yes|yes|Cave|type1=Ground|53-57|all = 30%}} | |||
{{Catch/entry6|126|Magmar|yes|yes|Cave|type1=Fire|49-53|all = 4%}} | |||
{{Catch/entry6|219|Magcargo|yes|yes|Cave|type1=Fire|type2=Rock|53-57|all = 25%}} | |||
{{Catch/entry6|323|Camerupt|yes|yes|Cave|type1=Fire|type2=Ground|53-57|all = 11%}} | |||
{{Catch/entry6|324|Torkoal|yes|yes|Cave|type1=Fire|53-57|all = 5%}} | |||
{{Catch/entry6|514|Simisear|yes|yes|Cave|type1=Fire|53-57|all = 11%}} | |||
{{Catch/entry6|555|Darmanitan|yes|yes|Cave|type1=Fire|53-57|all = 14%}} | |||
{{Catch/div|cave|Special}} | |||
{{catch/entry6|485|Heatran|yes|yes|Special|100|all=One|type1=Fire|type2=Steel}} | |||
{{Catch/footer|cave}} | {{Catch/footer|cave}} | ||
| Line 58: | Line 103: | ||
{{trainerheader|cave}} | {{trainerheader|cave}} | ||
{{Trainerentry|Infernal Cultist.png{{!}}150px|Infernal Cultist||3540|1|663|Talonflame||59|None}} | {{Trainerentry|Infernal Cultist.png{{!}}150px|Infernal Cultist||3540|1|663|Talonflame||59|None}} | ||
{{Trainerentry|Infernal Cultist.png{{!}}150px|Infernal Cultist||3480|2|631|Heatmor||58|None|392|Infernape|| | {{Trainerentry|Infernal Cultist.png{{!}}150px|Infernal Cultist||3480|2|631|Heatmor||58|None|392|Infernape||58|None}} | ||
{{Trainerentry|Infernal Cultist.png{{!}}150px|Infernal Cultist||3480|2|219|Magcargo||58|None|323|Camerupt||58|None}} | {{Trainerentry|Infernal Cultist.png{{!}}150px|Infernal Cultist||3480|2|219|Magcargo||58|None|323|Camerupt||58|None}} | ||
{{Trainerentry|Infernal Cultist.png{{!}}150px|Infernal Cultist||3540|1|637|Volcarona||59|None}} | {{Trainerentry|Infernal Cultist.png{{!}}150px|Infernal Cultist||3540|1|637|Volcarona||59|None}} | ||
| Line 65: | Line 110: | ||
{{Trainerentry|Infernal Cultist.png{{!}}150px|Infernal Cultist||3540|1|257|Blaziken||59|None}} | {{Trainerentry|Infernal Cultist.png{{!}}150px|Infernal Cultist||3540|1|257|Blaziken||59|None}} | ||
{{Trainerentry|Infernal Cultist.png{{!}}150px|Infernal Cultist||3480|2|078|Rapidash||58|None|668|Pyroar||58|None}} | {{Trainerentry|Infernal Cultist.png{{!}}150px|Infernal Cultist||3480|2|078|Rapidash||58|None|668|Pyroar||58|None}} | ||
{{trainerfooter|cave|6}} | {{trainerfooter|cave|6}} | ||
===On Easy difficulty=== | |||
{{Party/Single | |||
|color={{ruby color light}} | |||
|headcolor={{gold color light}} | |||
|bordercolor={{ruby color dark}} | |||
|sprite=Zenith.png | |||
|size=80px | |||
|prize={{PDollar}}6000 | |||
|class=Cult Leader | |||
|classlink=Cult | |||
|name={{color2|000|Zenith}} | |||
|game=XY | |||
|location=Fiery Caverns | |||
|pokemon=5}} | |||
|{{Pokémon/6 | |||
|type1=Fire | |||
|type2=Fighting | |||
|ndex=257 | |||
|ability=Blaze | |||
|pokemon=Blaziken | |||
|held= | |||
|level=59 | |||
|move1type=Fire|move1=Flare Blitz|move1cat=Physical | |||
|move2type=Fighting|move2=Sky Uppercut|move2cat=Physical | |||
|move3type=Fighting|move3=Bulk Up|move3cat=Status | |||
|move4type=Flying|move4=Brave Bird|move4cat=Physical}} | |||
|{{Pokémon/6 | |||
|type1=Ground | |||
|type2=Steel | |||
|ndex=530 | |||
|ability=Sand Rush | |||
|pokemon=Excadrill | |||
|held= | |||
|level=59 | |||
|move1type=Ground|move1=Earthquake|move1cat=Physical | |||
|move2type=Normal|move2=Horn Drill|move2cat=Physical | |||
|move3type=Rock|move3=Rock Slide|move3cat=Physical | |||
|move4type=Normal|move4=Swords Dance|move4cat=Status}} | |||
|{{Pokémon/6 | |||
|type1=Bug | |||
|type2=Fire | |||
|ndex=637 | |||
|ability=Flame Body | |||
|pokemon=Volcarona | |||
|level=59 | |||
|move1type=Bug|move1=Quiver Dance|move1cat=Status | |||
|move2type=Psychic|move2=Psychic|move2cat=Special | |||
|move3type=Fire|move3=Flamethrower|move3cat=Special | |||
|move4type=Bug|move4=Silver Wind|move4cat=Special}} | |||
{{Party/Div|color={{ruby color light}}}} | |||
|style="margin:auto"|{{Pokémon/6 | |||
|type1=Ghost | |||
|type2=Fire | |||
|ndex=609 | |||
|ability=Flash Fire | |||
|pokemon=Chandelure | |||
|held= | |||
|level=59 | |||
|move1type=Fire|move1=Flamethrower|move1cat=Special | |||
|move2type=Ghost|move2=Confuse Ray|move2cat=Status | |||
|move3type=Ghost|move3=Shadow Ball|move3cat=Special | |||
|move4type=Fire|move4=Will-O-Wisp|move4cat=Status}} | |||
|style="margin:auto"|{{Pokémon/6 | |||
|type1=Fire | |||
|type2=Rock | |||
|ndex=219 | |||
|ability=Magma Armor | |||
|pokemon=Magcargo | |||
|held=Magcargonite | |||
|level=60 | |||
|move1type=Normal|move1=Recover|move1cat=Status | |||
|move2type=Ground|move2=Earth Power|move2cat=Special | |||
|move3type=Fire|move3=Lava Plume|move3cat=Special | |||
|move4type=Rock|move4=Ancient Power|move4cat=Special}} | |||
{{Party/Footer}} | |||
===On Normal difficulty=== | |||
{{Party/Single | |||
|color={{ruby color light}} | |||
|headcolor={{gold color light}} | |||
|bordercolor={{ruby color dark}} | |||
|sprite=Zenith.png | |||
|size=80px | |||
|prize={{PDollar}}6100 | |||
|class=Cult Leader | |||
|classlink=Cult | |||
|name={{color2|000|Zenith}} | |||
|game=XY | |||
|location=Fiery Caverns | |||
|pokemon=5}} | |||
|{{Pokémon/6 | |||
|type1=Fire | |||
|type2=Fighting | |||
|ndex=257 | |||
|ability=Speed Boost | |||
|pokemon=Blaziken | |||
|held=Focus Sash | |||
|level=59 | |||
|move1type=Fire|move1=Blaze Kick|move1cat=Physical | |||
|move2type=Fighting|move2=Low Kick|move2cat=Physical | |||
|move3type=Normal|move3=Swords Dance|move3cat=Status | |||
|move4type=Flying|move4=Brave Bird|move4cat=Physical}} | |||
|{{Pokémon/6 | |||
|type1=Ground | |||
|type2=Steel | |||
|ndex=530 | |||
|ability=Sand Rush | |||
|pokemon=Excadrill | |||
|held=Life Orb | |||
|level=59 | |||
|move1type=Ground|move1=Earthquake|move1cat=Physical | |||
|move2type=Steel|move2=Iron Head|move2cat=Physical | |||
|move3type=Rock|move3=Rock Slide|move3cat=Physical | |||
|move4type=Normal|move4=Swords Dance|move4cat=Status}} | |||
|{{Pokémon/6 | |||
|type1=Bug | |||
|type2=Fire | |||
|ndex=637 | |||
|ability=Flame Body | |||
|pokemon=Volcarona | |||
|level=60 | |||
|move1type=Bug|move1=Quiver Dance|move1cat=Status | |||
|move2type=Grass|move2=Giga Drain|move2cat=Special | |||
|move3type=Fire|move3=Fire Blast|move3cat=Special | |||
|move4type=Bug|move4=Bug Buzz|move4cat=Special}} | |||
{{Party/Div|color={{ruby color light}}}} | |||
|style="margin:auto"|{{Pokémon/6 | |||
|type1=Ghost | |||
|type2=Fire | |||
|ndex=609 | |||
|ability=Flame Body | |||
|pokemon=Chandelure | |||
|held= | |||
|level=60 | |||
|move1type=Fire|move1=Overheat|move1cat=Special | |||
|move2type=Grass|move2=Energy Ball|move2cat=Special | |||
|move3type=Ghost|move3=Shadow Ball|move3cat=Special | |||
|move4type=Normal|move4=Substitute|move4cat=Status}} | |||
|style="margin:auto"|{{Pokémon/6 | |||
|type1=Fire | |||
|type2=Rock | |||
|ndex=219 | |||
|ability=Flame Body | |||
|ability2=Magma Armor | |||
|pokemon=Magcargo | |||
|held=Magcargonite | |||
|level=61 | |||
|move1type=Psychic|move1=Amnesia|move1cat=Status | |||
|move2type=Poison|move2=Toxic|move2cat=Status | |||
|move3type=Fire|move3=Lava Plume|move3cat=Special | |||
|move4type=Poison|move4=Acid Armor|move4cat=Status}} | |||
{{Party/Footer}} | |||
===On Hard difficulty=== | |||
{{Party/Single | |||
|color={{ruby color light}} | |||
|headcolor={{gold color light}} | |||
|bordercolor={{ruby color dark}} | |||
|sprite=Zenith.png | |||
|size=80px | |||
|prize={{PDollar}}6200 | |||
|class=Cult Leader | |||
|classlink=Cult | |||
|name={{color2|000|Zenith}} | |||
|game=XY | |||
|location=Fiery Caverns | |||
|pokemon=6}} | |||
|{{Pokémon/6 | |||
|type1=Fire | |||
|type2=Fighting | |||
|ndex=257 | |||
|ability=Speed Boost | |||
|pokemon=Blaziken | |||
|held=Life Orb | |||
|level=60 | |||
|move1type=Fire|move1=Overheat|move1cat=Special | |||
|move2type=Fighting|move2=High Jump Kick|move2cat=Physical | |||
|move3type=Ice|move3=Hidden Power|move3cat=Special | |||
|move4type=Normal|move4=Protect|move4cat=Status}} | |||
|{{Pokémon/6 | |||
|type1=Ground | |||
|type2=Steel | |||
|ndex=530 | |||
|ability=Mold Breaker | |||
|pokemon=Excadrill | |||
|held=Choice Scarf | |||
|level=60 | |||
|move1type=Ground|move1=Earthquake|move1cat=Physical | |||
|move2type=Steel|move2=Iron Head|move2cat=Physical | |||
|move3type=Rock|move3=Rock Slide|move3cat=Physical | |||
|move4type=Normal|move4=Return|move4cat=Physical}} | |||
|{{Pokémon/6 | |||
|type1=Normal | |||
|type2=Ground | |||
|ndex=660 | |||
|held=Focus Sash | |||
|ability=Huge Power | |||
|pokemon=Diggersby | |||
|level=61 | |||
|move1type=Ground|move1=Earthquake|move1cat=Physical | |||
|move2type=Normal|move2=Return|move2cat=Physical | |||
|move3type=Normal|move3=Quick Attack|move3cat=Physical | |||
|move4type=Normal|move4=Swords Dance|move4cat=Status}} | |||
{{Party/Div|color={{ruby color light}}}} | |||
|{{Pokémon/6 | |||
|type1=Bug | |||
|type2=Fire | |||
|ndex=637 | |||
|held=Passho Berry | |||
|ability=Flame Body | |||
|pokemon=Volcarona | |||
|level=61 | |||
|move1type=Bug|move1=Quiver Dance|move1cat=Status | |||
|move2type=Grass|move2=Giga Drain|move2cat=Special | |||
|move3type=Fire|move3=Fire Blast|move3cat=Special | |||
|move4type=Ground|move4=Hidden Power|move4cat=Special}} | |||
|{{Pokémon/6 | |||
|type1=Ghost | |||
|type2=Fire | |||
|ndex=609 | |||
|ability=Flame Body | |||
|pokemon=Chandelure | |||
|held=Focus Sash | |||
|level=61 | |||
|move1type=Fire|move1=Fire Blast|move1cat=Special | |||
|move2type=Psychic|move2=Trick Room|move2cat=Status | |||
|move3type=Ghost|move3=Shadow Ball|move3cat=Special | |||
|move4type=Ice|move4=Hidden Power|move4cat=Special}} | |||
|{{Pokémon/6 | |||
|type1=Fire | |||
|type2=Rock | |||
|ndex=219 | |||
|ability=Flame Body | |||
|pokemon=Magcargo | |||
|held=Magcargonite | |||
|level=62 | |||
|move1type=Normal|move1=Shell Smash|move1cat=Status | |||
|move2type=Poison|move2=Clear Smog|move2cat=Special | |||
|move3type=Fire|move3=Fire Blast|move3cat=Special | |||
|move4type=Ground|move4=Earth Power|move4cat=Special}} | |||
{{Party/Footer}} | |||
==Layout== | |||
{| class="roundy" style="margin:auto; background: #000; border: 5px solid #{{locationcolor/dark|cave}}" | |||
|- | |||
! style="background:#{{locationcolor/light|cave}}; {{roundytl|3px}}" | | |||
! style="background:#{{locationcolor/light|cave}}" | Room 1 | |||
! style="background:#{{locationcolor/light|cave}}" | Room 2 | |||
! style="background:#{{locationcolor/light|cave}}; {{roundytr|3px}}" | Room 3 | |||
|- | |||
! style="background:#{{locationcolor/light|cave}}" | 1F | |||
| [[File:FieryCaverns.png|225x225px]] | |||
| [[File:FieryCaverns1FR2.png|225x225px]] | |||
! style="margin:auto" | [[File:FieryCaverns1FR3.png|225x225px]] | |||
|- | |||
! style="background:#{{locationcolor/light|cave}}" | B1F | |||
! colspan="2" | [[File:FieryCavernsB1FR2.png|450x225px]] | |||
| [[File:FieryCavernsB1FR3.png|225x225px]] | |||
|} | |||
{{Torren}} | {{Torren}} | ||
Latest revision as of 04:45, 24 September 2021
| |||
| |||
| Location: | Middle of Hekate Town | ||
|---|---|---|---|
| Region: | Torren | ||
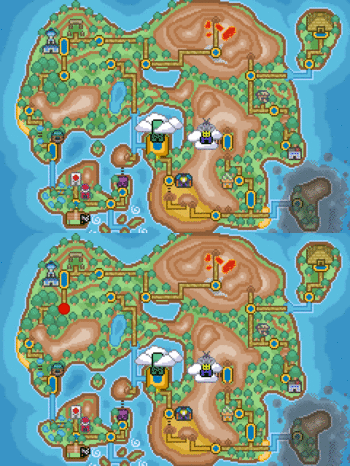 Interactive Map Location of Fiery Caverns in Torren. | |||
| Locations | |||
The Fiery Caverns are a series of caves found within Hekate Town. The caves are filled with numerous pools of lava, some of which require the player to push boulders into in order to cross. When the player investigates the caves for the first time, they will face Infernal Cultists and attempt to stop their operation.
Walkthrough
- Bypass the ledges and surf north across the two pools of water.
- Travel east until a boulder is located.
- Push the boulder north and then west into the hole in the floor.
- Follow the boulder down into the hole.
- Hop across the boulder to the other side of the lava and then head up the stairs to find the next boulder.
- Push this boulder down and then head down the stairs to the left side of where the boulder landed.
- Push the boulder all the way to the right until it stops against a pool of lava, then run around to the top side of the boulder and push it three spaces down.
- Run around to the right side of the boulder and push it as far left as possible, then run around to the top side of it and push it as far down as possible.
- Run around to the right side of the boulder and push it 7 spaces to the left, then run around to the top side of it and push it as far down as possible.
- Push the boulder to the right until it is knocked out into the pool of lava and blocks off the lava's flow.
- Head northwest and hop back across the lava again before heading south and passing over the platform to the east.
- Continue east until the player reaches the entrance to the next cave.
- Once inside the next cave, follow the path northward until the player comes to a bridge.
- Cross the bridge, head east and climb up the platform, and then push the next boulder down to the level below.
- Head down to the level below and push the boulder from the right side as far left as possible.
- Push the boulder down three spaces and then push the boulder to the left until it is in front of the bridge.
- Push the boulder up until it collides with the ledge and then push the boulder as far right as possible.
- Push the boulder up 2 spaces and then push it right 5 spaces.
- Push the boulder up as far as possible and then push it left 3 spaces.
- Push the boulder up as far as possible and then push it to the left and into the pool of lava to raise the bridge's level up.
- Navigate around the ledges to cross the newly raised bridge.
- Continue north to proceed with the story.
Items
| Item | Location | ||
|---|---|---|---|
| Mysterious Scroll | Head up the ladder on B1F; reward for completing the Meloetta tile puzzle | ||
| Delta Froslassite | B1F Room 3; to the right of the Delta Snorunt (requires Tesseract) | ||
| Delta Glalitite | B1F Room 3; to the left of the Delta Snorunt (requires Tesseract) | ||
Pokémon
Delta Snorunt can be encountered by using Tesseract in the area with the third boulder and then following the path northwestward.
Heatran has the possibility of spawning in B1F, Room 3 if and only if the player knocks it out during the events concerning the Magma Stone in the Infernal Dungeon.
1F
| Pokémon | Location | Levels | Rate | |||||||
|---|---|---|---|---|---|---|---|---|---|---|
|
|
49-53 | 14%
| |||||||
|
|
53-57 | 25%
| |||||||
|
|
53-57 | 11%
| |||||||
|
|
53-57 | 25%
| |||||||
|
|
53-57 | 11%
| |||||||
|
|
53-57 | 14%
| |||||||
| Surfing | ||||||||||
|
|
53-57 | 30%
| |||||||
|
|
49-53 | 60%
| |||||||
|
|
53-57 | 1%
| |||||||
|
|
49-53 | 5%
| |||||||
|
|
53-57 | 4%
| |||||||
| Fishing | ||||||||||
|
|
49-53 | 70%
| |||||||
|
|
49-53 | 30%
| |||||||
|
|
53-57 | 40%
| |||||||
|
|
53-57 | 60%
| |||||||
|
|
53-57 | 4%
| |||||||
|
|
53-57 | 40%
| |||||||
|
|
5-10 | 1%
| |||||||
|
|
53-57 | 15%
| |||||||
|
|
53-57 | 40%
| |||||||
| Special Pokémon | ||||||||||
|
|
50 | One
| |||||||
B1F
| Pokémon | Location | Levels | Rate | |||||||
|---|---|---|---|---|---|---|---|---|---|---|
|
|
49-53 | 14%
| |||||||
|
|
53-57 | 25%
| |||||||
|
|
53-57 | 11%
| |||||||
|
|
53-57 | 25%
| |||||||
|
|
53-57 | 11%
| |||||||
|
|
53-57 | 14%
| |||||||
B1F (Inner Cave)
| Pokémon | Location | Levels | Rate | |||||||
|---|---|---|---|---|---|---|---|---|---|---|
|
|
53-57 | 30%
| |||||||
|
|
49-53 | 4%
| |||||||
|
|
53-57 | 25%
| |||||||
|
|
53-57 | 11%
| |||||||
|
|
53-57 | 5%
| |||||||
|
|
53-57 | 11%
| |||||||
|
|
53-57 | 14%
| |||||||
| Special Pokémon | ||||||||||
|
|
100 | One
| |||||||
Trainers
| Trainer | Pokémon | |||||||||||
|---|---|---|---|---|---|---|---|---|---|---|---|---|
|
| |||||||||||
|
| |||||||||||
| ||||||||||||
|
| |||||||||||
| ||||||||||||
|
| |||||||||||
|
| |||||||||||
| ||||||||||||
|
| |||||||||||
| ||||||||||||
|
| |||||||||||
|
| |||||||||||
| ||||||||||||
On Easy difficulty
|
||||||||||||||||||||||||||||||||||||||||||||||||||||||||||||||||||||||||||||||||||||||||||||||||||||||||||||||||||||||||||||||||||||||||||||||||||||||||||||||||||||||||||||||||
| ||||||||||||||||||||||||||||||||||||||||||||||||||||||||||||||||||||||||||||||||||||||||||||||||||||||||||||||||||||||||||||||||||||||||||||||||||||||||||||||||||||||||||||||||
On Normal difficulty
|
||||||||||||||||||||||||||||||||||||||||||||||||||||||||||||||||||||||||||||||||||||||||||||||||||||||||||||||||||||||||||||||||||||||||||||||||||||||||||||||||||||||||||||||||
| ||||||||||||||||||||||||||||||||||||||||||||||||||||||||||||||||||||||||||||||||||||||||||||||||||||||||||||||||||||||||||||||||||||||||||||||||||||||||||||||||||||||||||||||||
On Hard difficulty
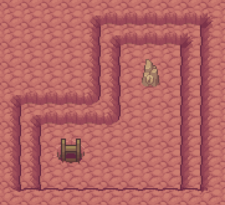
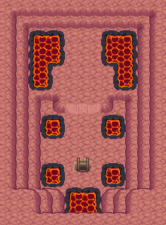
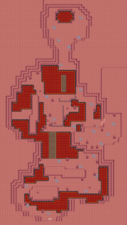
Layout
| Room 1 | Room 2 | Room 3 | |
|---|---|---|---|
| 1F | 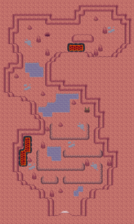
|
|
|
| B1F | 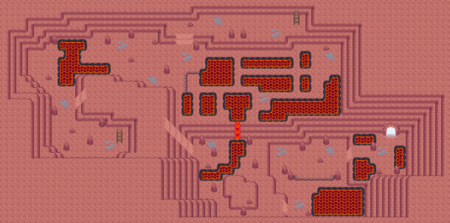
|
| |
| Torren | ||||||||
|---|---|---|---|---|---|---|---|---|
| ||||||||
|
