|
|
| (6 intermediate revisions by 2 users not shown) |
| Line 13: |
Line 13: |
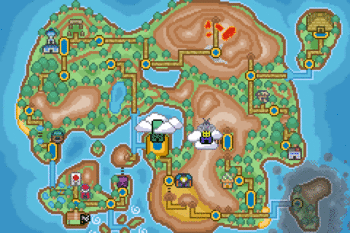
| The '''Safari Zone''' is a special Pokémon preserve in [[Torren]] that {{pkmn|Trainer}}s can enter to capture Pokémon. It is divided into five different areas: two grassy areas, one water area, one desert-like area, and a hidden area. In addition to the geography, the Pokémon encountered in each area are very different. | | The '''Safari Zone''' is a special Pokémon preserve in [[Torren]] that {{pkmn|Trainer}}s can enter to capture Pokémon. It is divided into five different areas: two grassy areas, one water area, one desert-like area, and a hidden area. In addition to the geography, the Pokémon encountered in each area are very different. |
|
| |
|
| For {{PDollar}}500, the player can play the '''Safari Game''' and receive 30 {{BLink|Safari Ball}}s. {{pkmn|Trainer}}s are limited to 500 steps in the Safari Zone before the Game is over. | | For {{PDollar}}500, the player can play the '''Safari Game''' and receive 30 {{BLink|Safari Ball}}s. {{pkmn|Trainer}}s are limited to 600 steps in the Safari Zone before the Game is over. |
|
| |
|
| In the Safari Zone, when a {{BLink|wild Pokémon}} appears, Trainers cannot send out Pokémon to battle it. Instead, Trainers must face Pokémon only with simple tools, and catching a Pokémon becomes much more reliant on luck, as Pokémon are able to run away from the Trainer at any time. | | In the Safari Zone, when a {{BLink|wild Pokémon}} appears, Trainers cannot send out Pokémon to battle it. Instead, Trainers must face Pokémon only with simple tools, and catching a Pokémon becomes much more reliant on luck, as Pokémon are able to run away from the Trainer at any time. |
| Line 20: |
Line 20: |
|
| |
|
| ==Walkthough== | | ==Walkthough== |
| The Safari Zone is an optional area that gives the player the opportunity to capture a number of exclusive Pokémon. There is also a chance to catch the legendary {{BLink|Thundurus}} after clearing the [[Dragon Ruins]]. | | The Safari Zone is an optional area that gives the player the opportunity to capture a number of exclusive Pokémon. There is also a chance to catch two different legendary Pokémon depending on the player's progression in the story. |
| ===Finding Thundurus=== | | ===Finding Thundurus=== |
| * Travel northwest, passing the two pink shrubs next to a lady riding a bike. | | * Travel northwest, passing the two pink shrubs next to a lady riding a bike. |
| Line 35: |
Line 35: |
| * Using Tesseract, the boulder will then appear in the past. Push the boulder inside of the pit adjacent to it. | | * Using Tesseract, the boulder will then appear in the past. Push the boulder inside of the pit adjacent to it. |
| * After all of that, go back into the present and hop across the pit using the boulder and encounter the wild {{p|Thundurus}}. Note that though the player is still within the Safari Zone, Thundurus will be battled using normal methods and will be captured using the standard Poké Balls found in the player's bag. | | * After all of that, go back into the present and hop across the pit using the boulder and encounter the wild {{p|Thundurus}}. Note that though the player is still within the Safari Zone, Thundurus will be battled using normal methods and will be captured using the standard Poké Balls found in the player's bag. |
| | |
| | ===Starting Tornadus Chase=== |
| | * After getting [[Waterfall]], climbing the waterfall in the northeast section will put the player into a new area with {{p|Tornadus}} sitting there. Trying to interact with him causes him to run away to the lower portion of [[Route 6]], which is accessible from [[Route 15]]. |
|
| |
|
| ==Items== | | ==Items== |
| Line 62: |
Line 65: |
| {{Catch/entry6|130|Gyarados|yes|yes|Fish Good|type1=Water|type2=Flying|52-56|all = 40%}} | | {{Catch/entry6|130|Gyarados|yes|yes|Fish Good|type1=Water|type2=Flying|52-56|all = 40%}} |
| {{Catch/entry6|211|Qwilfish|yes|yes|Fish Good|type1=Water|type2=Poison|52-56|all = 60%}} | | {{Catch/entry6|211|Qwilfish|yes|yes|Fish Good|type1=Water|type2=Poison|52-56|all = 60%}} |
| | {{Catch/entry6|171|Lanturn|yes|yes|Fish Super|type1=Water|type2=Electric|52-56|all = 4%}} |
| | {{Catch/entry6|211|Qwilfish|yes|yes|Fish Super|type1=Water|type2=Poison|52-56|all = 40%}} |
| | {{Catch/entry6|349|Feebas|yes|yes|Fish Super|type1=Water|5-10|all = 1%}} |
| | {{Catch/entry6|367|Huntail|yes|yes|Fish Super|type1=Water|52-56|all = 15%}} |
| | {{Catch/entry6|368|Gorebyss|yes|yes|Fish Super|type1=Water|52-56|all = 40%}} |
| {{Catch/footer|Water}} | | {{Catch/footer|Water}} |
|
| |
|
| Line 85: |
Line 93: |
| {{Catch/entry6|130|Gyarados|yes|yes|Fish Good|type1=Water|type2=Flying|52-56|all = 40%}} | | {{Catch/entry6|130|Gyarados|yes|yes|Fish Good|type1=Water|type2=Flying|52-56|all = 40%}} |
| {{Catch/entry6|211|Qwilfish|yes|yes|Fish Good|type1=Water|type2=Poison|52-56|all = 60%}} | | {{Catch/entry6|211|Qwilfish|yes|yes|Fish Good|type1=Water|type2=Poison|52-56|all = 60%}} |
| | {{Catch/entry6|171|Lanturn|yes|yes|Fish Super|type1=Water|type2=Electric|52-56|all = 4%}} |
| | {{Catch/entry6|211|Qwilfish|yes|yes|Fish Super|type1=Water|type2=Poison|52-56|all = 40%}} |
| | {{Catch/entry6|349|Feebas|yes|yes|Fish Super|type1=Water|5-10|all = 1%}} |
| | {{Catch/entry6|367|Huntail|yes|yes|Fish Super|type1=Water|52-56|all = 15%}} |
| | {{Catch/entry6|368|Gorebyss|yes|yes|Fish Super|type1=Water|52-56|all = 40%}} |
| {{Catch/footer|Water}} | | {{Catch/footer|Water}} |
|
| |
|
| Line 99: |
Line 112: |
| {{Catch/entry6|130|Gyarados|yes|yes|Fish Good|type1=Water|type2=Flying|52-56|all = 40%}} | | {{Catch/entry6|130|Gyarados|yes|yes|Fish Good|type1=Water|type2=Flying|52-56|all = 40%}} |
| {{Catch/entry6|211|Qwilfish|yes|yes|Fish Good|type1=Water|type2=Poison|52-56|all = 60%}} | | {{Catch/entry6|211|Qwilfish|yes|yes|Fish Good|type1=Water|type2=Poison|52-56|all = 60%}} |
| | {{Catch/entry6|171|Lanturn|yes|yes|Fish Super|type1=Water|type2=Electric|52-56|all = 4%}} |
| | {{Catch/entry6|211|Qwilfish|yes|yes|Fish Super|type1=Water|type2=Poison|52-56|all = 40%}} |
| | {{Catch/entry6|349|Feebas|yes|yes|Fish Super|type1=Water|5-10|all = 1%}} |
| | {{Catch/entry6|367|Huntail|yes|yes|Fish Super|type1=Water|52-56|all = 15%}} |
| | {{Catch/entry6|368|Gorebyss|yes|yes|Fish Super|type1=Water|52-56|all = 40%}} |
| {{Catch/footer|Water}} | | {{Catch/footer|Water}} |
|
| |
|
| Line 119: |
Line 137: |
| {{Catch/entry6|642|Thundurus|yes|yes|Special|70|type1=Electric|type2=Flying|all=One}} | | {{Catch/entry6|642|Thundurus|yes|yes|Special|70|type1=Electric|type2=Flying|all=One}} |
| {{Catch/footer|Land|Special}} | | {{Catch/footer|Land|Special}} |
| | |
| | ==Layout== |
| | ===Areas in Present Time=== |
| | {| class="roundy" style="margin:auto; background: #000; border: 5px solid #{{locationcolor/dark|grass}}" |
| | |- |
| | ! style="background:#{{locationcolor/light|grass}}; {{roundytl|3px}}" | |
| | ! style="background:#{{locationcolor/light|grass}};" | West |
| | ! style="background:#{{locationcolor/light|grass}}; {{roundytr|3px}}" | East |
| | |- |
| | ! style="background:#{{locationcolor/light|grass}};" | North |
| | | [[File:SafariZoneNorthwest1.png|225x225px]] |
| | | [[File:SafariZoneNortheast1.png|225x225px]] |
| | |- |
| | ! style="background:#{{locationcolor/light|grass}};" | South |
| | | [[File:SafariZoneSouthwest1.png|225x225px]] |
| | | [[File:SafariZoneSoutheast1.png|225x225px]] |
| | |} |
| | |
| | ===Areas in Past Time=== |
| | {| class="roundy" style="margin:auto; background: #000; border: 5px solid #{{locationcolor/dark|grass}}" |
| | |- |
| | ! style="background:#{{locationcolor/light|grass}}; {{roundytl|3px}}" | |
| | ! style="background:#{{locationcolor/light|grass}};" width="225px" | West |
| | ! style="background:#{{locationcolor/light|grass}}; {{roundytr|3px}}" | East |
| | |- |
| | ! style="background:#{{locationcolor/light|grass}};" | North |
| | | |
| | | [[File:SafariZoneNortheast2.png|225x225px]] |
| | |- |
| | ! style="background:#{{locationcolor/light|grass}};" height="225px" | South |
| | | |
| | | |
| | |} |
|
| |
|
| {{Torren}} | | {{Torren}} |
| [[Category:Torren]] | | [[Category:Torren]] |