|
|
| Line 48: |
Line 48: |
| {{Catch/entry6|213|Shuckle|yes|yes|Cave|15-17|type1=Bug|type2=Rock|all=5%}} | | {{Catch/entry6|213|Shuckle|yes|yes|Cave|15-17|type1=Bug|type2=Rock|all=5%}} |
| {{Catch/entry6|293|Whismur|yes|yes|Cave|15-17|type1=Normal|all=30%}} | | {{Catch/entry6|293|Whismur|yes|yes|Cave|15-17|type1=Normal|all=30%}} |
| {{Catch/entry6|296|Makuhita|yes|yes|Cave|15-17|type1=Fighting|all=5%}} | | {{Catch/entry6|296|Makuhita|yes|yes|Cave|15-17|type1=Fighting|all=4%}} |
| {{Catch/entry6|302|Sableye|yes|yes|Cave|15-17|type1=Dark|type2=Ghost|all=20%}} | | {{Catch/entry6|302|Sableye|yes|yes|Cave|15-17|type1=Dark|type2=Ghost|all=20%}} |
| {{Catch/entry6|524|Roggenrola|yes|yes|Cave|15-17|type1=Rock|all=10%}} | | {{Catch/entry6|524|Roggenrola|yes|yes|Cave|15-17|type1=Rock|all=10%}} |
| | {{Catch/entry6|674|Pancham|yes|yes|Cave|15-18|type1=Fighting|all=1%}} |
| {{Catch/div|water|Surfing}} | | {{Catch/div|water|Surfing}} |
| {{Catch/entry6|194|Wooper|yes|yes|Surf|15-17|type1=Water|type2=Ground|all=90%}} | | {{Catch/entry6|194|Wooper|yes|yes|Surf|15-17|type1=Water|type2=Ground|all=90%}} |
| Line 59: |
Line 60: |
| {{Catch/entry6|129|Magikarp|yes|yes|Fish Good|15-17|type1=Water|all=60%}} | | {{Catch/entry6|129|Magikarp|yes|yes|Fish Good|15-17|type1=Water|all=60%}} |
| {{Catch/entry6|369|Relicanth|yes|yes|Fish Good|15-17|type1=Water|type2=Rock|all=40%}} | | {{Catch/entry6|369|Relicanth|yes|yes|Fish Good|15-17|type1=Water|type2=Rock|all=40%}} |
| | {{Catch/entry6|130|Gyarados|yes|yes|Fish Super|15-17|type1=Water|type2=Flying|all=40%}} |
| | {{Catch/entry6|369|Relicanth|yes|yes|Fish Super|15-17|type1=Water|type2=Rock|all=60%}} |
| {{Catch/div|cave|Rock Smash}} | | {{Catch/div|cave|Rock Smash}} |
| {{Catch/entry6|074|Geodude|yes|yes|Rock Smash|Scales with Party Pokémon|type1=Rock|type2=Ground|all=33%}} | | {{Catch/entry6|074|Geodude|yes|yes|Rock Smash|Scales with Party Pokémon|type1=Rock|type2=Ground|all=33%}} |
Cyan Cavern is a two-floored cave that connects Route 2 and Suntouched City.
Walkthrough
- The pathway through this area is very straightforward; simply follow the path between the two floors in order to reach the exit to Suntouched City.
Items
| Item
|
Location
|

|
Magnet
|
B1F; at the top of the rock formation in the middle of the area
|

|
Great Ball
|
B1F; on the ground along the northern-most wall
|

|
Feraligatite
|
B1F; dive in the lake
|
|
|
Rock Smash
Pokémon
| Pokémon
|
Location
|
Levels
|
Rate
|
|
|
|
15-17
|
20%
|
|
|
|
15-17
|
10%
|
|
|
|
15-17
|
5%
|
|
|
|
15-17
|
30%
|
|
|
|
15-17
|
4%
|
|
|
|
15-17
|
20%
|
|
|
|
15-17
|
10%
|
|
|
|
15-18
|
1%
|
| Surfing
|
|
|
|
15-17
|
90%
|
|
|
|
14-16
|
10%
|
| Fishing
|
|
|
|
15-17
|
70%
|
|
|
|
15-17
|
30%
|
|
|
|
15-17
|
60%
|
|
|
|
15-17
|
40%
|
|
|
|
15-17
|
40%
|
|
|
|
15-17
|
60%
|
| Rock Smash
|
|
|
|
Scales with Party Pokémon
|
33%
|
|
|
|
Scales with Party Pokémon
|
8.5%
|
|
|
|
Scales with Party Pokémon
|
16.5%
|
|
|
|
Scales with Party Pokémon
|
25%
|
|
|
|
Scales with Party Pokémon
|
8.5%
|
|
|
|
Scales with Party Pokémon
|
8.5%
|
|
|
Trainers
1F
B1F
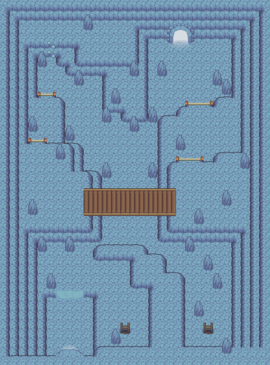
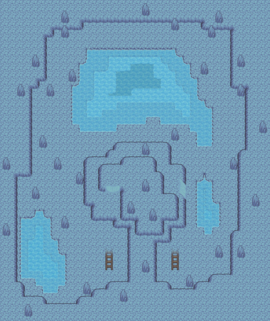
Layout
| 1F
|
B1F
|
|
|
Trivia
- A Secret Base theme exists whose name and design are derived from this location.