Midna Mine: Difference between revisions
From The Pokemon Insurgence Wiki
mNo edit summary |
mNo edit summary |
||
| Line 56: | Line 56: | ||
==Pokémon== | ==Pokémon== | ||
{{Catch/header|cave|2}} | {{Catch/header|cave|2}} | ||
{{Catch/entry6|041|Zubat|yes|yes|Cave|10-12|type1=Poison|type2=Flying|all= | {{Catch/entry6|041|Zubat|yes|yes|Cave|10-12|type1=Poison|type2=Flying|all=25%}} | ||
{{Catch/entry6|213|Shuckle|yes|yes|Cave|10-12|type1=Bug|type2=Rock|all= | {{Catch/entry6|213|Shuckle|yes|yes|Cave|10-12|type1=Bug|type2=Rock|all=10%}} | ||
{{Catch/entry6|231|Phanpy|yes|yes|Cave|10-12|type1=Ground|all= | {{Catch/entry6|231|Phanpy|yes|yes|Cave|10-12|type1=Ground|all=30%}} | ||
{{Catch/entry6|299|Nosepass|yes|yes|Cave|10-12|type1=Rock|all= | {{Catch/entry6|299|Nosepass|yes|yes|Cave|10-12|type1=Rock|all=30%}} | ||
{{Catch/entry6|529|Drilbur|yes|yes|Cave|10-12|type1=Ground|all= | {{Catch/entry6|529|Drilbur|yes|yes|Cave|10-12|type1=Ground|all=5%}} | ||
{{Catch/div|water|Surfing}} | {{Catch/div|water|Surfing}} | ||
{{Catch/entry6|060|Poliwag|yes|yes|Surf|10-12|type1=Water|all= | {{Catch/entry6|060|Poliwag|yes|yes|Surf|10-12|type1=Water|all=65%}} | ||
{{Catch/entry6|086|Seel|yes|yes|Surf|10-12|type1=Water|all= | {{Catch/entry6|086|Seel|yes|yes|Surf|10-12|type1=Water|all=35%}} | ||
{{Catch/div|water|Fishing}} | {{Catch/div|water|Fishing}} | ||
{{Catch/entry6|118|Goldeen|yes|yes|Fish Old|10-12|type1=Water|all= | {{Catch/entry6|118|Goldeen|yes|yes|Fish Old|10-12|type1=Water|all=70%}} | ||
{{Catch/entry6|366|Clamperl|yes|yes|Fish Old|10-12|type1=Water|all= | {{Catch/entry6|366|Clamperl|yes|yes|Fish Old|10-12|type1=Water|all=30%}} | ||
{{Catch/entry6|118|Goldeen|yes|yes|Fish Good|10-12|type1=Water|all= | {{Catch/entry6|118|Goldeen|yes|yes|Fish Good|10-12|type1=Water|all=60%}} | ||
{{Catch/entry6|366|Clamperl|yes|yes|Fish Good|10-12|type1=Water|all= | {{Catch/entry6|366|Clamperl|yes|yes|Fish Good|10-12|type1=Water|all=20%}} | ||
{{Catch/entry6|370|Luvdisc|yes|yes|Fish Good|10-12|type1=Water|all= | {{Catch/entry6|370|Luvdisc|yes|yes|Fish Good|10-12|type1=Water|all=20%}} | ||
{{Catch/div|cave|Rock Smash}} | {{Catch/div|cave|Rock Smash}} | ||
{{Catch/entry6|074|Geodude|yes|yes|Rock Smash|Scales with Party Pokémon|type1=Rock|type2=Ground|all= | {{Catch/entry6|074|Geodude|yes|yes|Rock Smash|Scales with Party Pokémon|type1=Rock|type2=Ground|all=22.5%}} | ||
{{Catch/entry6|213|Shuckle|yes|yes|Rock Smash|Scales with Party Pokémon|type1=Bug|type2=Rock|all= | {{Catch/entry6|213|Shuckle|yes|yes|Rock Smash|Scales with Party Pokémon|type1=Bug|type2=Rock|all=5.5%}} | ||
{{Catch/entry6|299|Nosepass|yes|yes|Rock Smash|Scales with Party Pokémon|type1=Rock|all= | {{Catch/entry6|299|Nosepass|yes|yes|Rock Smash|Scales with Party Pokémon|type1=Rock|all=11%}} | ||
{{Catch/entry6|524|Roggenrola|yes|yes|Rock Smash|Scales with Party Pokémon|type1=Rock|all= | {{Catch/entry6|524|Roggenrola|yes|yes|Rock Smash|Scales with Party Pokémon|type1=Rock|all=16.5%}} | ||
{{Catch/entry6|557|Dwebble|yes|yes|Rock Smash|Scales with Party Pokémon|type1=Bug|type2=Rock|all=5.5%}} | |||
{{Catch/entry6|557|Dwebble|yes|yes|Rock Smash|Scales with Party Pokémon|type1=Bug|type2=Rock|all= | {{Catch/entry6|703|Carbink|yes|yes|Rock Smash|Scales with Party Pokémon|type1=Rock|type2=Fairy|all=5.5%}} | ||
{{Catch/entry6|703|Carbink|yes|yes|Rock Smash|Scales with Party Pokémon|type1=Rock|type2=Fairy|all= | |||
{{Catch/footer|cave}} | {{Catch/footer|cave}} | ||
Revision as of 01:01, 26 January 2015
| |||
| |||
| Location: | North of Midna Town | ||
|---|---|---|---|
| Region: | Torren | ||
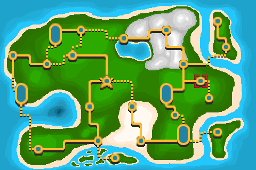 Interactive Map Location of Midna Mine in Torren. | |||
| Locations | |||
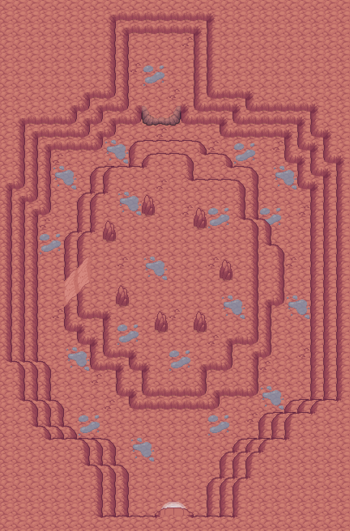
Midna Mine is a mine in the northern part of Midna Town next to the Trainer School.
Walkthrough
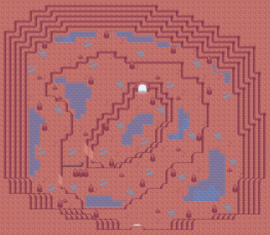
- As the path here is very straightforward, simply head down to the second area while exploring the rest of the cave.
- In Area 2, walk up the stairs leading to the top of a platform to find Nora.
- After reading Nora's dialogue, leave the mine.
Items
| Item | Location | ||
|---|---|---|---|
| Potion |
| ||
| Escape Rope | Area 1; northeast of Ace Trainer Donatello | ||
| Super Potion | Area 1; southwestern corner | ||
| Full Heal | Area 1; in the third rock standing in a row southeast of Firebreather Ninra (hidden) | ||
| Poké Ball | Area 1; in a rock southwest of Parasol Lady Yvonne (hidden) | ||
| Awakening | Area 1; on the ground, north of Parasol Lady Yvonne | ||
| Burn Heal | Area 1; in a rock to the west of the Awakening (hidden) | ||
| TM110 Round | Area 1; western part of the map (requires Surf | ||
| Helix Fossil | Area 2; southwestern cluster of rocks on top of the platform | ||
| Dome Fossil | Area 2; northwestern cluster of rocks on top of the platform | ||
| Claw Fossil | Area 2; northeastern cluster of rocks on top of the platform | ||
| Armor Fossil | Area 2; southeastern cluster of rocks on top of the platform | ||
Rock Smash
| Item | Location | ||
|---|---|---|---|
| Hard Stone | Randomly found by smashing rocks | ||
| IV Stone | Randomly found by smashing rocks | ||
| Heart Scale | Randomly found by smashing rocks | ||
| Pearl | Randomly found by smashing rocks | ||
| Soft Sand | Randomly found by smashing rocks | ||
| Helix Fossil | Randomly found by smashing rocks | ||
| Dome Fossil | Randomly found by smashing rocks | ||
| Old Amber | Randomly found by smashing rocks | ||
| Root Fossil | Randomly found by smashing rocks | ||
| Claw Fossil | Randomly found by smashing rocks | ||
| Skull Fossil | Randomly found by smashing rocks | ||
| Armor Fossil | Randomly found by smashing rocks | ||
| Cover Fossil | Randomly found by smashing rocks | ||
| Plume Fossil | Randomly found by smashing rocks | ||
| Jaw Fossil | Randomly found by smashing rocks | ||
| Sail Fossil | Randomly found by smashing rocks | ||
Pokémon
| Pokémon | Location | Levels | Rate | |||||||
|---|---|---|---|---|---|---|---|---|---|---|
|
|
10-12 | 25%
| |||||||
|
|
10-12 | 10%
| |||||||
|
|
10-12 | 30%
| |||||||
|
|
10-12 | 30%
| |||||||
|
|
10-12 | 5%
| |||||||
| Surfing | ||||||||||
|
|
10-12 | 65%
| |||||||
|
|
10-12 | 35%
| |||||||
| Fishing | ||||||||||
|
|
10-12 | 70%
| |||||||
|
|
10-12 | 30%
| |||||||
|
|
10-12 | 60%
| |||||||
|
|
10-12 | 20%
| |||||||
|
|
10-12 | 20%
| |||||||
| Rock Smash | ||||||||||
|
|
Scales with Party Pokémon | 22.5%
| |||||||
|
|
Scales with Party Pokémon | 5.5%
| |||||||
|
|
Scales with Party Pokémon | 11%
| |||||||
|
|
Scales with Party Pokémon | 16.5%
| |||||||
|
|
Scales with Party Pokémon | 5.5%
| |||||||
|
|
Scales with Party Pokémon | 5.5%
| |||||||
Trainers
| Trainer | Pokémon | |||||||||||
|---|---|---|---|---|---|---|---|---|---|---|---|---|
|
| |||||||||||
| ||||||||||||
| ||||||||||||
|
| |||||||||||
| ||||||||||||
|
| |||||||||||
|
| |||||||||||
| ||||||||||||
|
| |||||||||||
| ||||||||||||
| ||||||||||||
|
| |||||||||||
| ||||||||||||
|
| |||||||||||
| ||||||||||||
| ||||||||||||
Layout
| Area 1 | Area 2 |
|---|---|
|

|
